-->

Whole Wheat Toasted Oatmeal Chocolate Chip Cookies


Hi there! We're excited to be back on the blog! It's been a busy past few weeks filled with tests, papers, a surprise trip home for Halloween, and of course some fun outings around the Boston area. Mary and I are so surprised at how quickly this semester has been flying by, and are trying to soak in every last moment of New England fall before we head home for Thanksgiving. 

While we love taking advantage of seasonal fall flavors, lately we have both been wanting to take a break from the "pumpkin craze" and save our appetites for our famous homemade pumpkin pie we make each Thanksgiving. Enter these Whole Wheat Toasted Oatmeal Chocolate Chip Cookies, a new twist on one of our favorite classic sweets. 


Over the years, our family has tried countless oatmeal cookie recipes, and has never seemed to come up with a recipe we use time and time again. Whether the cookies are too flat, too crispy, too dry, or just one-note, we have never been able to find a family favorite. When we came across this quick and easy recipe, we jumped on the opportunity to continue the quest for a family favorite. We liked the substitution of whole wheat flour in place of white, and were intrigued by the direction to toast the oats for about 7-10 minutes before mixing them into the dough. 

After making a few small changes to the recipe, including a reduction in the amount of chocolate chips, (I like my oatmeal cookies with chips but Mary doesn't) these cookies certainly didn't turn out one-note. The nutty flavor created from the toasted oats and whole wheat flour takes the classic cookie to the next level, and we were most surprised by the fact they didn't turn out flat or overly crispy. We might just have a winner for the new family favorite, and we're already looking forward to making these for our family to see if they agree!


Whole Wheat Toasted Oatmeal Chocolate Chip Cookies
Recipe adapted from Two Peas and their Pod
Ingredients
  • 1 1/4 cup white whole wheat flour (we used Trader Joe's)
  • 1 1/4 cups old-fashioned oats
  • 1/2 teaspoon salt
  • 1/2 teaspoon baking powder
  • 1/2 teaspoon baking soda
  • 1/4 teaspoon ground cinnamon
  • 1/2 cup unsalted butter, room temperature
  • 1/2 cup brown sugar
  • 1/2 cup granulated sugar
  • 1 large egg
  • 1 teaspoon vanilla extract (our favorite is Nielsen-Massey)
  • 1/2-1 cup semi-sweet chocolate chips (we used Ghirardelli)
Cooking Directions
  1. Preheat the oven to 350 degrees F. Line a large baking sheet with a Silpat baking mat or parchment paper and set aside.
  2. Spread the oats evenly on an ungreased baking sheet. Place in the oven for about 7-10 minutes, stirring once. When ready, the oats will turn light brown and have a nutty aroma. Remove from oven and let cool.
  3. In a medium bowl whisk together the flour, salt, baking powder, baking soda, and cinnamon. Set aside.
  4. Using a mixer, beat the butter and sugars together until smooth and creamy. Mix in the egg and vanilla. Slowly add the dry ingredients. Mix until just combined. Stir in the toasted oats and chocolate chips.
  5. Roll cookie dough into tablespoon size balls and place on prepared cookie sheet. Bake for 10 minutes or until light golden brown. Let cookies cool on the baking sheet for two minutes. Transfer to a cooling rack and cool completely.
We hope you enjoy this recipe! Stay tuned for some fun Two Spoonfuls holiday posts, we're excited! 

Fall Harvest Soup

The leaves are an autumn rainbow of reds, oranges, yellows and greens. Farmers markets are abounding with squash, pumpkins, apples, and colorful mums. A carton of fresh Massachusetts apple cider sits in the fridge and I just finished the last of the pumpkin muffins we baked this week. It’s official- the prime of New England fall has arrived. 

Mary and I have made this Fall Harvest soup two times so far this season, and are excited to share this recipe that showcases the best of fall’s flavors. Packed with butternut squash, sweet potatoes, kale, carrots, and tomatoes, it is loaded with flavor and very nutrient dense. The addition of quinoa and chickpeas is a great way to add in some protein, making this soup a great choice for vegetarians or vegans!


Fall Harvest Soup with Quinoa

Recipe adapted from Two Peas & Their Pod

Ingredients
  • 2 tablespoons olive oil
  • 1 yellow onion, diced
  • 2-3 carrots, chopped
  • 3 cloves garlic, minced
  • 1 large sweet potato, peeled and chopped
  • 2 cups chopped butternut squash
  • 4 cans (14 1/2oz. each) low-sodium vegetable broth
  • 2 cans (15 oz. each) diced tomatoes
  • 1 can (15 oz.) chickpeas, rinsed and drained
  • 1 cup quinoa
  • 1 tablespoon minced fresh rosemary
  • 2 teaspoons minced fresh thyme
  • 2 cups chopped kale, ribs and stems removed
  • 3 bay leaves
Cooking Directions
  1. Heat the olive oil in a large stockpot over medium heat. Add onion, carrot, and cook until onions are translucent, about 5 minutes. Add the garlic, sweet potato, bay leaves and butternut squash. Cook until vegetables are tender, about 10 minutes. Stir occasionally so they don't stick to the bottom of the pan.
  2.  Add the vegetable broth, tomatoes, and chickpeas. Stir in the quinoa and season with fresh rosemary and thyme. Cook for about 15 minutes or until quinoa is soft. Stir in the kale and cook for an additional 5 minutes. Season with salt and pepper, to taste. Serve warm. (Additional note: this soup freezes well. To freeze, cool completely and pour into a freezer container. When ready to eat, defrost and reheat on the stove or in the microwave.)
Enjoy!

Fall Harvest Feast

Happy Fall! It’s been too long since our last blog post, after our trip to the apple orchard. Between celebrating our 20th birthday with a family friend in town to spending this long weekend with two of our aunts, we have had many food outings to share in the past two weeks. The most unforgettable experience, however, happened last night in a small suburb of Boston. 

After driving through narrow, winding roads dotted with quaint farmhouses and lined with crimson and golden yellow leaves, our aunts and the two of us were greeted by a pen of sheep as we pulled into the parking lot of our destination. We walked down a wooded path to approach the Visitor’s Center at Drumlin Farm, where we checked in for our “sold out” Fall Harvest Feast. 

Picturesque Drumlin Farm 
The evening began with a spread of appetizers featuring fresh produce from the farm. We sampled a delicious beet hummus with carrots and freshly pickled wax beans and romanesco (an edible flower from the cauliflower family), as well as homemade elderberry soda and mulled apple cider. Then, we were off on a tour of Drumlin, a working farm and wildlife sanctuary with over 200 acres of land. We were able to see where the farm’s CSA vegetables are washed and distributed, sample cherry tomatoes fresh from the vine, and walk around the fields filled with kale, sweet potatoes, fresh herbs and a variety of other crops. 

Farm fresh carrots and beet hummus hit the spot!

After enjoying our tour, we headed back to the Visitor’s Center where we were seated for a family-style dinner. The meal began with a kale apple salad and warm bowls of butternut squash soup, which had an incredibly creamy texture and savory flavor. As we finished our appetizers, several pizzas were brought out of the oven. Our favorite was the fall veggie pizzakabocha squash (similar to butternut squash but a bit sweeter), cranberries, caramelized red onions, sage and ricotta cheese! All of our favorite fall flavors combined into a delicious slice! It was so cool to be eating a meal featuring completely farm-fresh ingredients that were harvested just the day before.


As if our dinner was not enough, the meal was followed by some spectacular desserts showcasing even more of fall’s great flavors. We both loved the rich chocolaty flavor of the homemade chocolate beet ice cream, and devoured our cups of homemade maple ice cream and cinnamon apple cake. By the end of dessert, we were very full, but were not miserably stuffed. There is just something different and more satisfying about eating fresh food! 

Beautiful Dessert Spread! 
Chalkboard displays were a perfect touch! 
Homemade Maple Ice Cream with Homemade "Mandel Bread" (a biscotti-like cookie) 
Last night was an incredible experience and such a great memory. Everything about the evening was picture perfect, from the gorgeous weather to the delicious fall flavors to the cozy, communal setting. The meal was about as “farm to table” as it gets, and gave us such an appreciation for all the work and love that goes into producing all of our favorite fall crops. We hope this is the first of many “Fall Harvest Feasts” that we will attend, and hope sometime you all get to experience an evening just as magical. 

Apple Pecan Galette

Growing up, Mary and I have many fond memories of apple picking in the fall with our dad. There's nothing like spending a fall weekend at an apple orchard, walking amongst the endless rows of trees abounding with colorful apples of many varieties. And if you're like our dad, you also can't resist the infamous warm apple cider donuts! Apple picking is a quintessential fall activity here in New England, and we were all too excited when late September came around the peak time for picking. 

With a free Saturday and a desire to get outside of the "campus bubble," Mary and I decided to go on an apple picking adventure. Picking an orchard was a harder task than we thought, as the New England area does not have any shortage of "pick your own" apple orchards. While we had heard of a few big name orchards that draw large crowds during peak season, we wanted to find a place with less of a commercial feel. We decided to visit Brooksby Farms, an orchard about 25 miles from campus in Peabody, Massachusetts. 


We picked a perfect fall day for picking and the trees were filled with big, beautiful apples at peak ripeness. Because the orchard was on the larger side, not all of the rows were labeled, but we know most of the apples we picked were Cortland and Macintosh. We "picked a peck" of apples, which is about 10lbs. Just enough apples for eating, and of course some for baking as well!


Naturally, coming home with fresh picked apples in the beginning of fall calls for the making of a festive apple dessert. We decided to make an Apple Pecan Galette, adapting a recipe we found from one of our favorite food bloggers, Cookie and Kate. While we both love getting creative with fruit pies, we don't always enjoy having so much crust, so a galette provides a happy medium! This recipe also has some healthier twists using wheat flour in place of white, and using only one tablespoon of sugar. 

Even with the healthier twists, this recipe produced a fantastic galette, perfectly showcasing the flavor of the fresh apples. The pecans also added a nice texture and depth to the sweet apple flavor. One of the things we love about galettes is the beauty in their "rustic," messy look even the slightly burnt pieces and imperfections add to their character (as seen below!). 


Apple Pecan Galette

Recipe adapted from Cookie and Kate
Ingredients
  •     1 1/4 cups whole wheat pastry flour
  •     1/2 teaspoon salt
  •     4-6 tablespoons ice water 
  •     8 tablespoons cold unsalted butter, cubed (for crust) 
  •     4 to 5 apples, sliced into 1/4" thick slices
  •     1 teaspoon cinnamon
  •     1/2 teaspoon nutmeg
  •     1 teaspoon vanilla 
  •     2 tablespoons butter, cut into pieces (for filling) 
  •     1/4 cup crushed pecan pieces 
  •     1 tablespoon maple syrup
  •     1 tablespoon raw sugar 
Cooking Directions-          
  1. In a large bowl, whisk together flour and salt.         
  2. Using a pastry cutter or butter knife, cut in cold butter cubes until the mixture has coarse crumbs.               
  3. Add four tablespoons ice water and mix with a spoon until mixture begins to form a workable dough. If mixture looks dry, add a tablespoon of ice water at a time until you reach the right consistency.             
  4. Form dough into a disk, wrap tightly in plastic and refrigerate for one hour.          
  5. Mix together apples, cinnamon, nutmeg, vanilla, butter and pecan pieces and sugar in a large bowl. 
  6. Preheat oven to 400 degrees F. Coat a large baking sheet with butter or cooking spray.     
  7. Place dough disk on a lightly floured surface. Roll the dough to approximately a 12 inch round, then place on prepared baking sheet.   
  8. Add your filling. Arrange apple slices in a circular pattern in layers, leaving at least two inches of crust around the edges. Top off with pecans left at the bottom of the bowl.         
  9. Start at one end and fold the dough edges over the filling, pleating it as you go around.      
  10. Use a pastry brush or sprinkle cold water over the crust. Drizzle a bit of maple syrup over the filling and sprinkle a light dusting of raw sugar over the crust.      
  11. Bake 40-50 minutes, or until the crust is slightly golden. Serve warm on its own or topped with ice cream.         
  12.         
    We hope you enjoy this recipe and take advantage of the delicious in-season flavors and ingredients of fall!
         

Orecchiette with Sweet Potatoes, Kale and Caramelized Onions


With the first day of fall shortly approaching, we have been anticipating our favorite season and all of the culinary delights it brings- pumpkin everything, apple cider, butternut squash, kale, just to name a few of our fall favorites! Here in New England, apple orchards are open and ready for picking, and we cannot wait to bring home a peck or two sometime soon! 

Our "Mise en place"
One of our favorite fall combinations is sweet potatoes and kale, as featured in our Black Bean Sweet Potato Kale Quesadillas recipe! We found a new recipe combining these two ingredients in a simple and delicious dinner, Orecchiette with Sweet Potatoes, Kale and Caramelized Onions. The combination of sweet and savory made for an excellent flavor. 

Sweet potatoes roasting in the oven!
To season the dish, we included some freshly chopped rosemary from one of the little herb pots growing on our dorm windowsill. We are currently growing dill, basil and rosemary, and have been trying to incorporate them into any recipe we can think of! To add protein into the dish, we also mixed in some cannellini beans. 

Our miniature "herb garden"
As the weather cools down, we are excited to warm up with homemade soups and other comforting dishes such as this one. Stay tuned for many more fall recipes, featuring our farmers market finds of the season's freshest produce! 


Orecchiette with Fall Vegetables

Recipe by The DeLallo Blog
Ingredients
  •     1 1lb package whole-wheat orecchiette
  •     3 tablespoons extra-virgin olive oil
  •     1 large sweet potato, peeled and diced
  •     1 onion, diced
  •     2 cloves garlic, minced
  •     1 small bunch kale, leaves blanched
  •     chopped rosemary, for garnish
  •     grated parmesan, for garnish
  •     salt and pepper, to taste
Cooking Directions          
  1. Preheat oven to 400 degrees. Toss sweet potatoes with olive oil, sea salt, pepper and rosemary. Place on a baking sheet and bake for 30 minutes.
  2. Bring a large pot of salted water to boil for pasta. Cook pasta according to package directions.
  3. In a large saucepan, heat olive oil. Add onions and garlic and cook until onions begin to brown. 
  4. Toss hot pasta, blanched kale leaves, and cooked sweet potatoes with onions in saucepan. Add pasta water, if desired, for sauce consistency. Cook together on medium heat for 2 minutes.
  5. Serve with grated parmesan. 
Enjoy!

A Trip to Boston Public Market

 Zucchini and eggplant and squash, oh my! While there may be just a few more weeks left of summer, there is plenty of late summer produce left to be enjoyed before September ends! Before we left for Boston two weeks ago, our family garden was abounding with squash and tomatoes, and while it is unfortunately not practical for our dad to ship us garden fresh produce each week, New England happens to be full of fresh summer crops as well!

After a long first week of sophomore year, Hannah and I were very excited to venture into the city for a trip to one of Boston’s newest culinary destinations, Boston Public Market. BPM, which opened at the end of July, is a one of a kind spot for foodies of all types, from sustainability-supporters to chocoholics to pasta lovers. It is an indoor farmers market, operating year round, where over 35 local vendors showcase their locally-produced items ranging from handmade cheeses, organic produce, artisan donuts, local honey, Mexican stone-ground chocolate, spiced nuts and so much more.  

Produce from Siena Farms, Sudbury, MA
As we pulled open the door to the market, a whiff of homemade apple cider donuts lured us inside, where a local orchard was selling several varieties of apples along with homemade spiced cider. The warm scent of fall excited us for the months to come, though we are enjoying summer while it’s still here!

We sampled these "ground cherries," little tomatoes with a surprisingly sweet taste!
Browsing through the different aisles of the market, each lined with vendors offering samples of their unique creations, we couldn’t believe what amazing items the market had to offer. We visited several farm stands, where long tables teemed with rich purple Black Beauty eggplants, vibrant red tomatoes and bright orange carrots. Though it was all so tempting, Hannah and I decided to pick up a pint of fresh blueberries, lettuce from a local greenhouse farm, plenty of eggplant and summer squash, and a few ripe peaches (which we sampled and were incredibly sweet and juicy). Our friend, who had invited us along to the market, bought a pint of raspberries, a dozen eggs from an organic farm, and a grilled cheese for lunch made with a blend of cheeses from Jasper Hill Farm, which she noted was the best grilled cheese she had ever tasted. 

Fresh pasta from Nella Pasta
Though it has only been a little over a month since its opening, Boston Public Market has already become a favorite spot for locals and tourists of all ages. We are excited to watch it continue to grow, as well as to check out some of the programs it offers, which include free cooking classes and seminars, cookbook exchanges and other monthly events.  

Beautiful Fairy Tale eggplants!
While we miss our friends, family, and fresh produce back at home, selecting some local New England fruits and vegetables from the market was almost like picking them from our own backyard! Take advantage of the last few weeks of summer, and make sure to stock up on the last of summer’s produce while you can! I will be testing out a new Eggplant Parmesan recipe using the eggplant we picked up at the market, and I am excited to share it with you soon!

Enjoy,

Peanut Butter Banana Cookies

After moving in to our apartment style dorm Monday night and living in the space for a few days, Mary and I now feel like we are settled in. We are really enjoying our new space, especially the "state-of-the-art" kitchen complete with trendy avocado colored laminate countertops who needs granite! Mostly, we are so glad that we came equipped with all the kitchen supplies we could possibly need (and some extras!), as we have already begun making some delicious meals and trying some of our favorite recipes. It is so exciting to think of how many wonderful meals we will have cooked in our tiny kitchen by the end of the school year!

With our sophomore year classes starting up on Monday, I wanted to make a homemade treat to include in our lunches. Not being on the college meal plan this year means packing lunches to eat between classes, so I love sprucing up packed lunches with a homemade treat. I wanted to try a new recipe using simple ingredients we had on hand, and was intrigued by this recipe for Peanut Butter Banana cookies how could you go wrong with the peanut butter banana combination! 


These cookies were so easy to whip up, and don't call for much sweetener as most of the sweetness comes from the bananas. They have a very interesting and tasty flavor combination almost like combining the flavor of banana bread with a peanut butter cookie! While I love my classic chocolate chip cookies, I also really enjoy trying new cookie varieties and this is a new favorite to add to my list. The sweet and salty combination is definitely a winner, and the recipe is fairly healthy and can easily be made healthier with some simple ingredient swaps (like wheat flour in place of white flour and honey instead of sugar!). 


We are so excited for the "college chapter" of Two Spoonfuls and will definitely miss our readers at home while we are here at school! In the meantime, if you're looking for a new cookie recipe, try this one! It won't disappoint. 

Here's a picture of our "beautiful" dorm kitchen, just for kicks! (Notice the spice jars

Peanut Butter Banana Cookies

Recipe by Gimme Some Oven
Ingredients
  • 2 cups all-purpose flour
  • 1 tsp. baking powder
  • 1/2 tsp. cornstarch
  • 1/2 tsp. salt
  • 1/4 tsp. baking soda
  • 1/4 tsp. ground cinnamon
  • 1/2 cup butter, softened
  • 1/2 cup brown sugar, packed
  • 1/2 cup creamy natural peanut butter
  • 1 egg
  • 1/2 cup mashed banana (about 1 medium banana)
  • 1 tsp. vanilla extract
Cooking Directions
  1. Heat oven to 350F. Line a baking sheet with parchment paper.
  2. In a medium mixing bowl, whisk the flour, baking powder, cornstarch, salt, baking soda and cinnamon until combined. Set aside.
  3. In the (separate) bowl of a stand mixer, cream the butter and brown sugar together on medium-high speed until light and fluffy, about 1 minute. Add peanut butter, egg, banana, and vanilla, and continue mixing on medium speed until combined, scraping down the sides of the bowl once if needed. Fold in the dry ingredients and mix until just combined.
  4. Measure out a rounded tablespoon-full of dough, roll it into a ball, then place on the baking sheet. Use a fork to press down the top of the ball and make a criss-cross pattern. Sprinkle with a pinch of cane sugar, if desired. Repeat with remaining dough.
  5. Bake for 8-10 minutes or until slightly golden around the edges. Cool for 10 minutes on baking sheet, then transfer to a wire rack to cool completely.
  6. Serve immediately or store in a sealed container for up to 1 week.
Enjoy!

Showing off your Spices! (a DIY post)

Aside from being 16 hours away from home, one of the things Mary and I missed most during our freshman year of college was not having access to a kitchen. Instead of weekly baking and homemade family meals, being stuck with a college dining hall meal plan was a change we both had trouble adjusting to. We are both beyond excited that this year we will be living in a four person apartment-style dorm outfitted with a kitchen! 

We were also surprisingly thrilled to find out that the kitchen comes with no supplies. Instead of using old pots and pans shared by students even before we were born and covered in who-knows-what, having an unstocked kitchen meant taking on some fun projects to make the kitchen our own! While some may call us crazy bringing everything from our baking tips, cupcake liners, knife block and ice blue hand mixer and food processor, we are excited to continue our blogging adventures while at school. One of our latest kitchen projects we just had to share is our DIY (do-it-yourself) glass spice jars with chalkboard labels. 


If you have some occasional OCD design tendencies like I do, you might be unsatisfied with the wide assortment of spice jars of all shapes and sizes shoved inside your spice cabinet at home (at least, thats how the spices are "organized" at our house). Though our dad is a fabulous cook and loves his spices, his spice cabinet is a hodge podge of countless mismatched jars and shakers.

While this system may work for him, Mary and I wanted a more organized and cute solution to storing our herbs and spices. After some searches on Pinterest and trips to some of our favorite kitchen stores, we found the perfect solution!


After we decided on a kitchen color- a pretty robin's egg blue, we were so excited to find glass spice jars from World Market that perfectly matched our kitchen decor. For less than a dollar apiece, we grabbed a couple dozen jars to have enough for all our favorite spices. 


After some Pinterest searching, we found the cutest free hand painted printable chalkboard spice jar labels that come in a variety of shapes and colors (via WorldLabel and painted by Emily McDowell). We chose the black circle design, and printed the template on full sheet label paper so we could cut the labels perfectly to size. 

We are so happy with how the spice jars turned out and can't wait to show them off in our new kitchen! Instead of shoving our spices in a cabinet, we plan on storing them in a cute wire spice rack we found, also from World Market! 


While glass spice jars may not be for everyone especially for those like our dad who have their own organized chaos of a kitchen, making these spice jars was a great way to show off our spices and in turn save a bit of cabinet space! 

Enjoy,

Restaurant Review: Buttermilk

It's hard to believe that summer is nearly over! Since Mary and I will be heading back to Boston this Sunday, we have tried to make the most of our remaining summer days and enjoy the time saying our "see you later's" to friends and family. Of course our favorite gatherings involve both good friends and great food, so we have also had the chance to visit some of our favorite restaurants and even try some new places! One of the restaurants we have recently heard friends rave about is Buttermilk, a breakfast and lunch spot in Geneva, so yesterday I (Hannah) took our two "little sisters" out for a fun back-to-school breakfast celebration.

Cutest coffee counter inside Buttermilk  
The decor and atmosphere inside Buttermilk is what I would call "modern farmhouse," as the classic white walls and farm inspired fixtures are complemented by modern accents, giving the place an inviting and cozy feel. We waited about ten minutes before being seated, and enjoyed taking fun pictures while we waited.

Love the fun fixtures!
Buttermilk has a large menu with something for everyone! If you enjoy a sweet breakfast, they have a wide selection of pancakes, waffles, french toast, and crepesincluding lemon blueberry pancakes, banana nutella crepes, and tres leches french toast, just to name a few! If you're more of the eggs and bacon type, they also have many different types of omelets, skillets, benedicts, and breakfast sandwiches. 
Scrambled eggs, beautifully seasoned potatoes, and delicious chicken sausage!
One thing I quickly realized is how generous the portion sizes are! An order of two eggs comes with a large helping of delicious breakfast potatoes and a choice between toast, an english muffin, or a stack of two large buttermilk pancakes! For a little extra, you can even opt for one of their specialty pancakes, and I couldn't resist trying the lemon blueberry pancakes topped with a fresh blueberry 
compote. Though they were quite delicious, you also can't go wrong with their classic buttermilk cakes. Their signature buttermilk pancakes are fluffy, light, and just perfectly sweet. 

Anna, one of my "little sisters," tried the "Penelope omelet" with spinach, tomatoes, feta, and onions. From the few remains left on her plate, I could tell she really enjoyed itshe even said it was the best omelet she's ever had!  

Anna enjoying her spinach, feta, tomato omelet! 
Thanks to my other "little sis" Emme for taking most of these pictures! We've got a budding photographer on our hands! (she's only 8 years old!)

Emme and I 
 If you're looking for a great breakfast spot in the Chicago suburbs, Buttermilk is a definite place to check out! You can't beat the great food, darling decor, and prime location right near the Fox River downtown Geneva! 

Enjoy, 

Southern Peach Crisp

Greetings from the South! Mary and I have been away from the blog for a while since we are spending the week in Hilton Head, South Carolina, where our family visits every year. Relaxing on the beach with family, biking through the trails lined with sprawling live oak trees, and of course enjoying a taste of southern flavors what could be better!

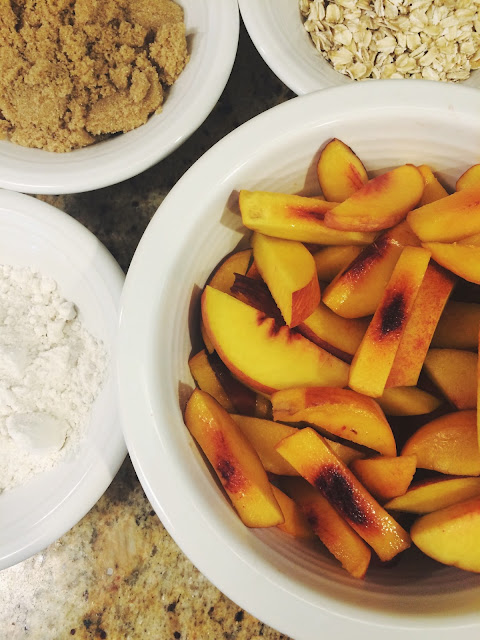
You can't visit the south in the summer without sampling some of the juicy peaches that reach their peak ripeness in the summer months. Farmers markets, grocery stores, and local fruit vendors are overflowing with cartons of these sunset colored fruits. Each year we stop at our favorite fruit stand on the way into the island from the Savannah airport. We make sure to pick up a basket (or two!) of the juiciest peaches we can find. 


If you've been following our blog, you may know we love incorporating seasonal ingredients in our savory dishes and desserts. Of course, this means a lot of fruit pies, galettes, and crisps featuring our favorite summer fruits and berries! While we have experimented with some new fruit desserts this summer (like our delicious raspberry buckle a few posts back!) for this post we decided to make a classic peach crisp. We made sure to pack some staple ingredients (sugars, flours, etc.) in our suitcases so we had the perfect amount for our peach dessert. 


This recipe uses very simple, on-hand ingredients and couldn't be easier to whip up for a family gathering, or just because! While the juicy peaches are really the star of the show, the buttery oat crumble makes for the perfect topping– some of our dinner guests remarked how they could eat the topping by itself! 


We are really looking forward to spending the week soaking up the sun and enjoying time with family before we head back to school in a few short weeks! Stay tuned for restaurant reviews of some of our favorite island eats! 

Peach Crisp:  
(Recipe adapted from Anne Burrell Food Network)

For the filling:
  • 5 large, ripe peaches, cut into chunks
  • 1 lemon, zested and juiced
  • 3 Tbsp. all-purpose flour
  • 1/4 cup tightly packed brown sugar
  • 2 Tbsp. sugar
  • pinch of salt
For the crisp topping:
  • 1 1/4 cups all-purpose flour
  • 1/2 cup rolled oats
  • 1/2 cup brown sugar
  • 1/2 cup sugar
  • 1 1/4 sticks cold, unsalted butter, cut into cubes
  • 1/2 cup sliced almonds (optional, I did not have on hand but would have been a nice touch!)
  • 1-2 Tbsp. cold water
Cooking Directions
  1. Preheat the oven to 350 degrees F.
  2. Toss the peaches in a large bowl with the zest and lemon juice. Add the rest of the ingredients and stir to combine. Pour the filling into a buttered 9x13" pan.
  3. Combine all of the ingredients in a food processor except the water. Pulse until combined, this will take about 30 seconds. Add water, 1 tablespoon at a time until mixture is clumpy but crumbly.
  4. Sprinkle the topping over the peaches. Be sure to loosely sprinkle the topping and not pack it down. The idea is to look very crumbly.
  5. Bake in the preheated oven for 20 to 25 minutes, or until the filling is hot and bubbly and the topping, golden brown and crispy.

Cooking Fiesta

Ever since we were in elementary school, we have both loved being in the kitchen. From watching our dad throw spices into a steaming pot of soup without using a recipe, to helping our mom sprinkle sea salt on her famous chocolate chip cookies, to taking cooking camps and classes. There is something so special about following your first recipe and preparing your first family dinner, with the guidance of a few trusted cooks. We have both been fortunate enough to work alongside several talented chefs and bakers after working as culinary assistants at Marcel’s Culinary Experience in Glen Ellyn. From learning to perfect French macarons to a week of exploring cuisines around the world, we have learned many tips and tricks from helping with a few of the many classes Marcel’s offers. Inspired by the chef’s at Marcel’s to share our love of cooking and learning with others, we were beyond excited when a family friend asked us to host a cooking class for a group of 8-11 year old girls. 

Our fiesta tablescape!
When the girls suggested a Mexican theme, Mary and I were so excited to select some great recipes for one of our favorite cuisines. We both love Hispanic food and culture, and had a hard time picking out menu items from the many great options. An authentic Mexican meal wouldn't be complete without chips, salsa, and guacamole, so we decided to make a homemade pico de gallo salsa and homemade guacamole to start. It was so fun for the girls to practice their knife skills chopping up all the necessary ingredients. After finishing the salsa and guacamole, we prepared crock-pot chicken tacos with all the proper taco fix-ins. Cooking the chicken the night before allowed the chicken to soak up the flavor and created the perfect tenderness for the chicken to shred easily.

Excellent knife skills!
For a fun and festive "dessert," we made homemade cinnamon sugar tortilla chips with a strawberry, kiwi, and mango salsa. To make the chips, we simply cut flour tortillas into small chip-sized wedges, coated them in butter and cinnamon sugar, and baked the chips at 350 degrees for about 8-10 minutes. 

Here are the salsa and guacamole recipes!

Homemade Salsa

Recipe adapted from Cooking Classy
Ingredients
  • 6 ripe Roma tomatoes, diced
  • 1 (14.5 oz) can petite diced tomatoes with green chiles, undrained
  • 2 green onions
  • 1/3 cup chopped red onion
  • 1 sliced jalapeno pepper with seeds removed (can use less if you prefer more mild salsa)
  • 1/3 cup fresh cilantro
  • 1 large clove garlic, sliced
  • 2 Tbsp. fresh lime juice
  • 1/2 tsp. chili powder
  • 1/4 tsp. ground cumin
  • 1/2 tsp. granulated sugar
  • salt and pepper, to taste
Cooking Directions
  1. Finely chop veggies and pour into a mixing bowl.
  2. Add canned tomatos, lime juice, chili powder, cumin and season with salt and pepper to taste and stir. Serve with tortilla chips. Store in refrigerator up to 1 week.   *Remove seeds for less heat or omit pepper if you don't like spicy foods


Homemade Guacamole
Recipe adapted from Cooking Classy 

Ingredients
  • 4 ripe Hass avocados, seeded and scooped from peel
  • 1 1/2 Tbsp. fresh lime juice
  • 1/4 cup + 2 Tbsp. finely chopped red onion
  • 1 large Roma tomato, diced
  • 1 clove garlic, minced
  • 2 Tbsp. chopped cilantro
  • 1-3 pinches cayenne pepper, optional
  • Salt and pepper, to taste
Cooking Directions
  1. Partially mash avocados with a fork in a large bowl, pour lime juice over top and continue to mash to reach desired consistency. Transfer to a mixing bowl.
  2. Run chopped red onions under cold water (to remove harsh bite from onion), drain well and add onions to avocado mixture, along with diced tomato, garlic, cilantro, cayenne pepper and season with salt and pepper to taste, stir to combine.